Showing posts with label Celebrations. Show all posts

Thursday, December 1, 2011

Date Night Leftovers = Crab Cake Eggs Benedict

Under Construction: Toasted artisan bread, crab cake, scallions, poached egg, remoulade (don't forget the Bloody Marys)
We are lucky to have my parents living quite close and, occasionally, they invite our children to spend the night. Sometimes we use this occasion for a dinner out or, more often, as a chance to go see some of the amazing live music available to us here in Music City U.S.A. But really our favorite thing to do is cook together the way we used to do before we had kids.

Back in The Day, we'd leisurely peruse the aisles of the supermarket, possibly having a plan for our meal or possibly waiting to be inspired. So on this recent date night, plans to play golf got rained out and we decided to do five-course dinner instead, followed by "playing" (i.e., me learning) chess by a roaring fire. Delightful!!

I don't have pictures for everything, but the food was so beautiful I couldn't help but snap a few pictures here and there. We hadn't done this in so long that I have to admit we got a bit carried away, but it was an awful lot of fun and a splurge I do not regret!

First Course
Fried Green Tomatoes (Brandywine) with  Goat Cheese and Stone Ground Mustard

Second Course
Mahi, oil-poached with pineapple sage, Garlicky Fingerling Potatoes, Broccolini

This beauty was 100% the spouse's brainchild: oil poaching without requiring a full pan of oil, with the bonus that we could finally use the fancy food saver. He prepped the mahi and cooked it in some low-simmering water, but 3/4 of the way through the damn bag broke, so it was only mostly "oil-poached." Making the most of things, we tossed our broccolini in the herby/lemony water with the fish and it turned out to be a happy -- and quite tasty -- accident in the end. 

Third Course
Crab Cake with Remoulade

Fourth Course
Lamb Chops with Roasted Fingerling Potatoes

Fifth Course was a cheese plate, for which I have no photo. I also must stress that, if you want to do this, the key is small portions of everything (that one piece of mahi, for example, yielded our two "portions" plus leftovers). You want a lovely taste, an exquisite mouthful or two to savor, but then you need to cook the next course, so if you get overloaded you might decide (like I did) to forego that lovely pea puree that would have been beautiful with the lamb and potatoes. C'est la vie. We had leftover broccolini and that was good enough for me!

The following morning, we woke and went about our day at a leisurely pace, enjoying coffee and then Bloody Marys, which lead to the inspired idea (again, credit to my spouse) to make a fantastic Eggs Benedict with our leftover crab cakes and remoulade. Then he strummed the guitar and indulged in a nap while I painted. 

Feed the body. Feed the Soul. Appreciate Our Time. Live Well.

We are planning a frugal-minded version of the 3+ Course Date Night very soon. Not surprisingly, it's easier to take pictures when the photographer is not also responsible for all of the cooking and prep, so I feel confident I'll be able to share that with you as well.

Sunday, April 17, 2011

Pink Icing Without Food Coloring

What must a mother do when her child has an option for a big, fancy cake with cartoon characters and chooses a Mommy-made cake? Well, here "mommy made" means somehow making a chocolate cake "with pink frosting" that has no crazy dyes.

As primates, oh heck...as animals, we get a wealth of information from color. Color can tell us if a tomato is ripe or not. Color can tell us that the pear has gone south. Studies show that we respond to color even more than actual flavor, which is why the best chefs know you "taste" a dish with your eyes first...food appeals to all the senses.

Back before chemistry entered the mix, food was colored only with natural dyes. Depending where you lived (and the season), you might use beets, turmeric, blueberries, flower petals...things like that. In modern times, food dyes are often bright and appealing and also often dangerous. It's hard to be a parent these days without at least hearing of the many ills associated with artificial food dyes, especially the very-common FD&C Red 40.  Almost everyone knows least one other parent who swears it turns their otherwise normal child into a little demon from the ninth level of Hades.

All that said, I don't generally disallow a treat just because it has some artificial dye. If a friend offers Skittles or M&Ms I will probably indulge and allow my kids to do the same. I even make Strawberry Jello at least once a year, though I am planning to use Mary Jane's ChillOver (vegan!) from here on out, so some red icing on a cake is no big deal, right?

Well, it's one thing to buy it or accept it and another to willingly and purposefully inject this stuff into something your child has requested.  Enter the googletubes: how do you make pink icing without food coloring?

I found several suggestions for raspberries and strawberries, along with admissions that the color was quite weak. Finally I settled upon trying dried hibiscus and beet root powder. I've taken some pictures to show the difference.

Here is the "pink" hibiscus butter mixed with sugar. My butter looked quite pink after simmering and straining. It was dotted with pink after cooling, and a lovely pink after it warmed back up and I stirred it. But when mixed with sugar, the pink was barely visible. It was a lot of work with no visible result.


Inclusion of beet root powder changes all! I added some cream cheese to my hibiscus butter/sugar mix to even out the already-pasty color (just in case, then added 1 TBSP beet root powder. I was impressed! The picture here shows a pink plastic cup to help gauge the pinkness that first TBSP. More powder = more pink. Yes, at this point I did realize it was just as easy as simply adding red food coloring! I was still nervous about possible flavor issues, so made juice from smushed strawberries and added that to thin the icing vs.using water or milk. I tasted with/without and it really doesn't matter, but the berries add a lovely, juicy note to the icing, so I consider them well worth the minimal trouble invested.

Here's the final result. It looks very pink and tastes even better. Pinkalicious!!


Thursday, December 23, 2010

Coconut Cake, like Gramma used to make!

My gramma made the most amazing coconut cake.  Light cake in thin layers almost (but not quite) dripping with a soft coconut moisture and a delicate icing that formed a crust on the outside...it always reminded me of the rare West Tennessee "sticking" snow on the first morning after it fell: dry and light with a thin layer of sleet on the top that crunched softly when your foot broke through.

My gramma, Marvene Tucker, made this cake at least once a year (sometimes twice), for a big family get-together, usually Christmas.  She was a lady who could take a bit of this and a touch of that and turn it into something not just palatable, but delicious.  She and my Grandpa Leon were farmers who made do with what they had and made it good.  But this cake, this Coconut Layer Cake, was a masterpiece worthy of the finest table.  It was beautiful to look upon, with its pure white towering goodness softly mottled with mounds of fresh coconut.  But it was even better to eat.

Two years ago, I decided to make a coconut cake for my dad for his birthday.  I tried tracking down the recipe from my dad's sisters but no one could remember the specifics since gramma never used a written recipe.  My mom recalled a "boiled icing of some sort."  For once, the intertubes were no help at all.  Recipe after recipe called for cream cheese or sweetened coconut or canned this or that.  I was at a loss and finally hit upon the brilliant idea of asking my neighbor, a True Southern Cook if ever I've met one.  My description of the icing hit home and Charlyn immediately said, "oh, that's Seven Minute Icing."  The cake is another story.  That year, I used a boxed white cake mix and moistened it with canned coconut "milk" and was forced to top the whole thing with sweetened coconut because I couldn't find unsweetened anywhere.

My dad, God love him, appreciated the effort.  And that cake was tasty.  But it wasn't THE cake.  When pressed, Dad noted how sweet the coconut tasted.  Yeah, I noticed it too.  I know Gramma only and ever used real coconut and somehow turned that into this cake, but had no clue how it worked until my husband caught an Alton Brown show about making an "old-fashioned" coconut cake.  Armed with this link and my memories (and parents' memories) of gramma's process, I pressed onward to coconutty delight.  I consider it part of my heritage, after all!


My dad with his authentic, totally from-scratch, like-mama-used-to-make Coconut Cake.

First of all, let me warn you that this cake is delicious.  Truly, truly delicious.  It is also a lot of work.  I did it over three days, which is a great way to tackle a project like this when you are unable to spend an entire day baking a cake.  Since you have the recipe already via my Alton Brown/Food Network link, I'll just note the things I did differently or found interesting enough to photograph.

Day One: Break down coconuts.  Make coconut cream, coconut milk.  
Day Two: Make Cake, soak with coconut water.
Day of service: Make icing, frost cake, refrigerate!

Per my husband's suggestion, I used a drill to make three holes in the coconut to access the coconut water.  This picture shows one coconut still with the hard shell and one (on the right) with the thin, brown "undershell."
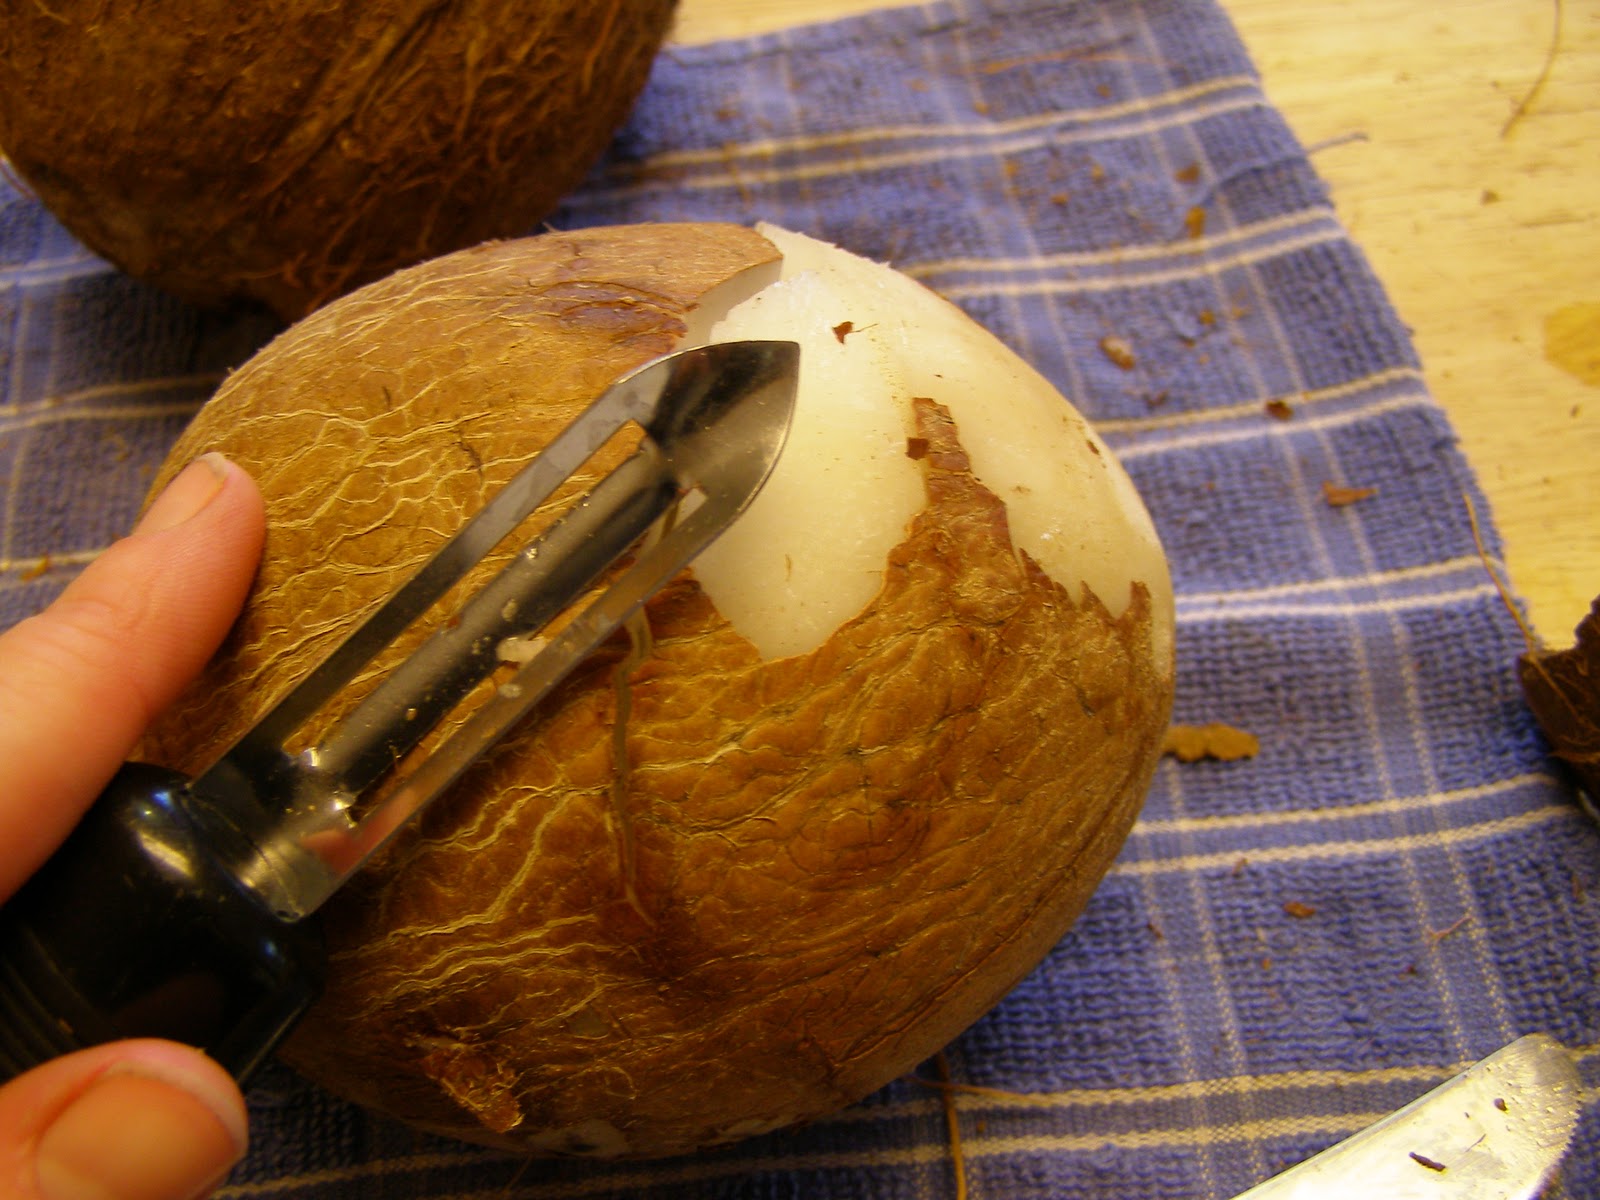
Alton Brown recommends using a serrated vegetable peeler, which I do not have.  The regular peeler worked just fine for me.
Coconut freed from the shell, ready to be rinsed.

Now, here I'll note that I followed the directions on the link to make coconut milk and coconut cream.  However, I later watched the actual Alton Brown episode and really like the method he uses in his show better.  It's a little fussier really, but if you're going all out, then go all out, right?

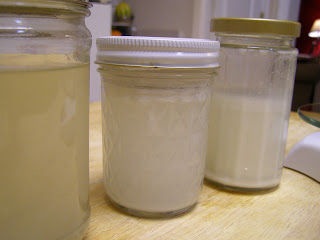
From l-r: coconut water, coconut milk, coconut cream
Frugal tip here: clean and save a few smallish jars.  They work much better for storing liquids, like sauces or stock, than a square saver.  They're nice to have around to mix up a vinaigrette without dirtying the blender.  I don't have many...I try to edit so I don't become a hoarder.  I probably have 5-6 jars in a 3-cup and under capacity and they come in handy frequently.  I can use Mason Jars for anything with more volume.

Day Two: Make Cake

My way to cut parchment to fit -- I made a line in the corner with my fingernail.  Alton has a neat technique but mine works just fine.
See?  Perfect circle for cutting.

Finished pans await batter.

Learn to get out and, if convenient, measure all ingredients before beginning.  Trust me, it makes it soooo much easier.  And then you never have to hunt for something with egg on your hands or realize to your horror that you don't have the very last ingredient you need.

I do not own a stand mixer. I'm sure it would be nice to have one, but I really don't have the space for it right now anyway.  I just mix a little higher speed and a little longer with my hand-me-down hand mixer.  Just like June Dye says, it comes out just fine.

This is what I consider to be "stiff peaks."  I add the egg whites to the batter in thirds, folding carefully each time.

Again, Alton has a neat way of cutting the cake evenly (this is why I sought out the video on the first place).  Unfortunately for me, my cooling rack did not fit into any rimmed pan I own, so I was forced to eyeball it.  This is fine; just be sure to try to assemble it so that the short sides butt up to the longer sides.

Four layers ready. 
Here I must share an important deviation from Alton Brown and his wussy spritzer bottle.  I love Alton Brown, truly, but a spray bottle?  No way!  A real coconut cake (like my gramma made) is almost dripping with moisture.  I used three coconuts and procured quite a bit of coconut water, so I reserved 1/3 cup to make the icing, leaving me with 1 1/4 cups coconut water.  After making the cake, I had some milk  and some cream remaining.  I mixed this all together and brushed it ALL over the cake.  Then I froze it.

Here's my freezer setup: cake layers separated by wax paper and wrapped tightly in plastic wrap. 
Theoretically, you could make this several days before.  Just be sure to pull it out of the freezer with plenty of time to defrost (if serving for dinner, put in the refrigerator the day before or that morning).

Serving Day!

Making icing.  Again, all ingredients are assembled beforehand.  Please don't skip this step!!  It makes cooking so much more fun, especially if you are doing it with children around.
Have a discriminating critic taste-test the icing to be sure it is acceptable.

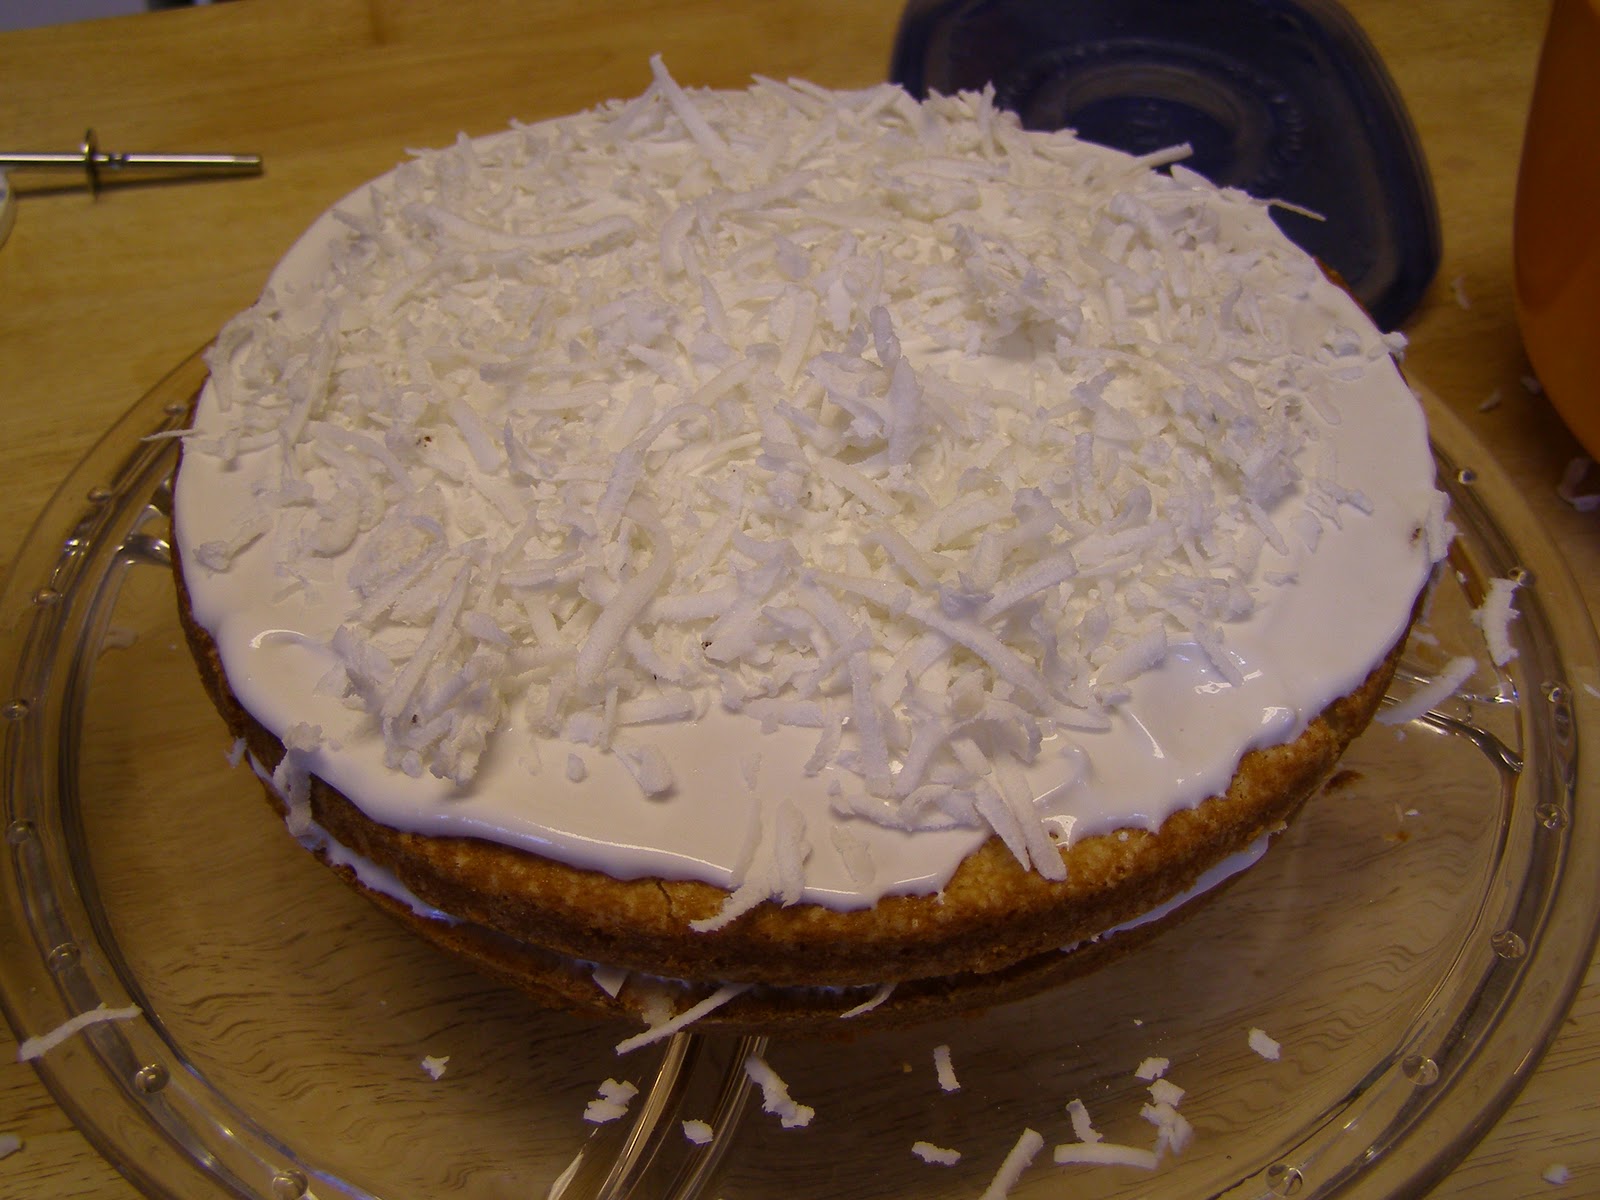
Ice the cake, alternating icing and coconut.  This icing does tend to be a little runny, so having cold layers helps keep everything where you want it.  Do not be afraid to secure the layers with a toothpick here or there; just try to keep count of how many toothpicks you use so you can remove them before serving to toddlers.
This came out wonderfully!  After eating it, my dad requested another for Christmas because, after all, that was his mother's tradition and if I wanted to be true to tradition then it was obvious.....

When I stopped laughing, I reminded him that she didn't make this masterpiece only a few weeks apart.  Since half of the cake was left, he recommended freezing it "like she used to" and we'd have it after our Christmas fondue.  Aha!  That was the freezing I remembered; however I like freezing the layers after soaking them and think it makes for a softer cake due to the freezing/thawing process.  If you wanted to just refrigerate, that would probably be fine too.  

I'll update in a few days to let you know how the cake makes it after a few weeks in the freezer.

Update: The second half of the cake froze beautifully and tasted great several weeks later. It actually reminded me more of my grandma's cake because she'd do that with her leftover cake. She'd often transfer it from the freezer to the fridge in the morning if she expected us to visit in the afternoon and sometimes the cake was still slightly frozen in the middle. It's definitely a bonus to freeze part when you make a cake requiring this much labor (speaking as a fairly basic baker here).

Tag Cloud

Make Your Own simplify Easy garden Inside My Fridge Living on Less recipes food frugal Live Well meal plan Tennessee Edible Landscaping Kitchen Garden organic Garden Tour Spring flowers Real American Food Use It All change vegetables Dinner Grow Your Own grow tomatoes Life Love Summer greens kids Family dinner recipes explore gift seeds Companion Plants Lettuce Reality Sink Saving Seeds bread freezer garlic squash Fall Inspiration Special Try It and See emotion moderation planting quick reduce Art Artisan Bread Beauty CSA Celebrations Cool Beverages Cucumber Experiment Featured Flood Sheet Mulch Small Changes Tea craft fruit reuse soup stock waste yogurt "sometimes food" Amaryllis Becky's Favorite Things Bloody Mary Blueberries Books Cabbage Chard Connections Date Night Edible Flowers Family Dinner Jacob's Ladder Lint No-till Organize Read Real Life TN Native Plant Trash Day Use the Oven Winter black-eyed susan chicken crock pot daily reminder essential oil garden pests kale leftovers permaculture plastic pork potatoes recycle rudbeckia seedling stir-fry strawberries swale trash vegetarian volunteer A-frame Authentic Authentic2 Bacon Baking Fail Better Homemade Body Balm Breakfast Build Soil Butter Carrots Chives Chocolate Milk Chocolate Syrup Christmas Clean Cookbook Review Crock Pot Bread Eat Local Faith Fire Cider Food as Medicine GM foods GMO Ginger HFCS Health Holy Honeysuckle Hot Cocoa Household cleaner Hydrangea Icebox Pickles Iced Mocha Immune Booster Iris Kitchen Sink Lent Life Notes Monsanto Morning Sink My Neighbor's Garden Pickles Placating with Plating PlantEaters Propagating Geraniums Sacred Salvia Leucantha School Lunch Sewing Slow Cooker Bread Slow Cooker Fail Spiderwort Spinach Spiritual Practice Spring roll Sprouts Thanksgiving Time-saving Tips Tincture Turkey Turmeric Victory Garden Vodka Water Kefir What Chefs Feed Their Kids basil bento berm birthday borage brassica broccoli cabbage worm cake canned tomatoes chili coconut compost dessert discipline eggplant eggplant parmesan fennel flour food waste frosting gluten green beans greenhouse grocery healthy hair healthy scalp hornworm hugelkultur icing knead kneading kohlrabi landfill lasagna garden nasturtium natural hair wash no poo pancakes parsley patience pests pizza plantain potager processed sangria seed pot smoothie standing desk substitute for dill tarragon teacher appreciation teacher gift vegan water window crayons yeast

Eat Locally!