Really, you don't. Like me (until recently), you're probably using too much flour in your bread.
I've been playing with breadmaking the last few years, beginning with the no-knead Artisan bread and including the abysmal crockpot bread. Until this autumn, I'd made bread maybe once a week or so, to accompany dinner -- this was mainly for my toddlers who were certainly just as strangely and inconsistently picky as every other toddler I've ever met (but they'd always eat bread/butter and vegetables or fruit).
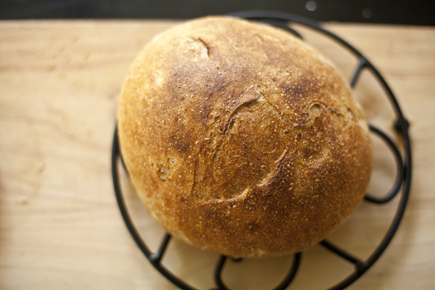
So how did I work my way up to the mouthwatering French-style loaves I positioned proudly at the top of this post? Well, this past autumn, a friend gave me a bread machine, and it is so easy to use that my spouse and I started making all of our sandwich bread from scratch. He has a wonderful light wheat with chia seed recipe, and I have been experimenting with sourdough.
Along the way, I've been seeking out instructional videos and advice from other sources about breadmaking and kneading, and I found out something really, really useful for anyone who is making anything that requires both flour and kneading: most of us use way too much flour when we first start baking.
When your recipe calls for 8 cups of flour, that generally means all of the flour, including what is kneaded into the bread. So mix 7 cups into the bread, and hold out the last cup for kneading. Then flour your board very lightly with flour, not a whole huge mound of it.
I don't have a marble countertop, so I usually knead on a silpat. It works well!
Here's how much flour was left after kneading my French loaves. Bread with too much flour will be much heavier and denser -- it really makes an amazing difference!
Now, I have baked plenty of tasty loaves before learning this tidbit. In general, I find baking bread to be surprisingly forgiving for an experiential learner (like myself). But what a revelation! Next time you plan to knead, save our some of the recipe flour; you'll be glad you did.
This Spring, I saw a really intriguing link on my Facebook feed that said "You can cook Bread in your Crock Pot! - It takes less time than the oven because the rising time is included in the Baking." Despite the weird capitalization, I was intrigued!
Not my slow-cooker bread
I did a quick web search for "slow cooker bread" since that Facebook page did not include the URL from which the pictures originated (a huge peeve of mine). Thankfully, the blog was easy to find, and you can read the original post here. She uses an artisan bread, which I cook regularly, so I was ready to go.
According to the directions, you place ~1 lb. of dough in your crock pot on parchment and turn it on high. In one hour, you have delicious bread!
That sounds so simple.....
Here is my dough, ready to go, in my 8-quart slow cooker. I added the lid and turned it to high.
One hour later: the dough flattened (instead of rising) and was gummy and raw. The lid was beginning to take on a lot of moisture, so I cracked it a bit, so as not to soak the loaf. I held out hope.
Two hours later: still not done. I finally pulled it out around the 3-hour mark, and the results were...flat. Here you can see the crock loaf (l) next to one baked in the oven (r).
Despite these bad results, I remained undeterred. Perhaps the 8-quart slow cooker was too big or too hot. I read the comments on the original blog post and decided to try my 1-quart crock instead. A crock uses a lot less energy than an oven, plus no hot kitchen in summer, right? I had to give it another go.
Dough ready to go in my 1-quart crock. Fingers crossed.
Once again, it took several hours to achieve anything approximating "done." While it did not flatten, due to lack of room in the crock, there was no rising. Here, the "finished loaf" at 2-ish hours is not terribly appetizing.
Second crock loaf (l) is the same height as oven-baked (r), but horridly doughy and dense due to lack of rise. The oven loaf spreads a bit, then rises, and has a wonderful texture. I even put the top of the crock-"baked" loaf under the broiler, so it had an even color, but it tasted awful anyway.
After having zero rise on the second loaf, I decided this method is not for me, unless I get helpful feedback in the comments. The artisan bread takes at most one hour, and I'd rather fire up the oven for a consistent, successful result loved by the whole family than keep trying at the crock.
If you get different results, let me know. If you're only moderately interested in slow-cooker bread, because you want to try something new, I recommend trying instead the Soft 100% Whole Wheat Dinner Rolls from An Oregon Cottage. They are soft and tasty...and I made them without a stand mixer, several times, with consistent, delicious results!
There is nothing like still-warm-from-the-oven bread on the dinner table.
I absolutely love freshly-baked breads and muffins, but have always found kneading/rising and the intricacies of yeast to be daunting. It all just seemed like a lot of work when I can pick up a really nice loaf of bread at the bakery for a special dinner. Then I started hearing/reading about "no-knead artisan bread" and was intrigued. Finally, about two years ago, I stumbled across this "Artisan Bread in 5 Minutes a Day, Seriously" post and decided to give it a try.
Basically, it goes like this: dump ingredients into bowl, mix, cover loosely/let rise, put in fridge. Later, cut off dough, let sit, put in oven, eat yummy bread. Have I mentioned how my family raves about this bread? So, here it is again, with pictures. A printable recipe is here.
My ingredients: Flour (my "everyday" flour is a mix of unbleached white and King Arthur's white wheat), flaxseed meal, yeast, kosher salt, and warm water.
Put 1 1/2 Tablespoons of kosher salt and 1 1/2 Tablespoons of active dry yeast in a large bowl. If you are using the packets of yeast (this is what I bought at first), use two. Now that I make bread often, I buy yeast in bulk. I keep a jar of yeast in the fridge for regular use and store the rest in the freezer.
Add 3 cups of warm water (from the tap is fine). It should feel warm to the touch, but not hot.
Add 6 1/2 cups of unbleached all-purpose flour, using the "scoop and sweep" method to measure. This is a great place to experiment! Whole wheat, spelt flour, sprouted grains flour, etc. Here, I used 6 cups of my unbleached white/white wheat mix and 1/2 cup of flax meal. I love the subtle, nutty flavor of flax meal, it gives a beautiful color/texture to the bread, and it's also a really great thing to put into our bodies.
Mix until there are no more dry spots of flour. You can use a mixer if you have one, but I don't and I wouldn't use it for this even if I did. Here I am about halfway mixed; it's coming together, but I still have spots of dry flour.
Here, it's well-combined and ready to rise! I scrapes down the bowl sides also. I have a lid for my bowl with holes punched in the lid (more about that later), but you can just loosely cover your bowl with plastic wrap.
Bread rising: pictures from l-r at 2:30, 3:30 and 4:30, respectively. You can cut off a bit now for your first loaf or just pop it right into the fridge, which is what I did this time. I think the flavor develops better if it has some time to sit. With this amount of dough, I'll typically make three loaves over the course of 5-8 days. You can leave the dough in your fridge up to two weeks; it will develop more of a "sourdough" flavor as it sits.
You need to bake in a preheated, 450-degree oven. You can bake it in whatever you usually use in the oven: pyrex pan, pizza stone, cookie sheet, cast-iron skillet. I did try baking on a pizza stone with a little dish of water, but decided it was too fussy for me. Then I went searching for other options and loved the idea of using an enameled dutch oven as shown here at Oregon Cottage. I don't find that I need the parchment paper she uses and my dutch oven is quite large, but I use a little enameled stoneware baking with a lid. The crust comes out beautifully with this method!
Whatever you use, I recommend preheating the dish in the oven.
Here is the dough the following afternoon when I took it out of the fridge. As you can see, it lost a bit of mass as it cooled. Sprinkle some flour on the top and dust your hands. Have a sharp knife or kitchen scissors ready.
Pull and cut the amount of dough you want. Then stretch the dough to create a gluten cloak.
I did not even attempt to photograph myself shaping the loaf because this short video will be much more helpful.
Do note that your bread may look different from the bread in the video because she used 100% white flour and bread flour at that! Here is what my finished loaf looks like before I let it rest. You should really let it rest for at least 30 minutes, though 45 is better if you have the time. I have popped it in the oven after only 15-20 minutes in a pinch and it comes out fine, though it doesn't rise up quite as much in the oven.
Before baking, dust the top of your loaf with flour and then slash the top (I sometimes do an X design as well). I pop mine in the hot pan, put on the lid and cook for 15 minutes. Then I remove the lid and cook an additional 15 minutes. When it's finished, the crust should be brown and it should sound hollow when tapped. Remove to a cooling rack.
To store uneaten bread, turn the cut side down on a plate or cutting board. Sometimes I wrap it in a clean tea towel. I did try storing it in a plastic bag but the crust became soft right away and I found it was prone to mildew in the summer as we are in the humid South.
If you start making this often, as I did, you'll probably want to invest in a bowl with lid that is a good size for your fridge. I'd initially meant for this picture to show the holes drilled in the lid, but then I saw the cool reflection of my kitchen window in the lid and went that way instead. Just make sure the dough is mostly covered but has a way for any gases to escape.
I cannot believe how easy it is to make fresh bread for dinner! Basically, I make a ball, let it rest for 15 minutes, preheat the oven and my pan, pop it in when the oven beeps that it's preheated and cook for a half hour. It's simple to do while making other food -- or to have fresh bread for a leftover night. I love being able to take freshly baked bread when I visit a friend or neighbor.
Updated 4/8 to add picture of bread interior. This was the last loaf from this baking and had been in the fridge for about 6-7 days. The crumb is denser if I use a higher proportion of wheat flour, I have found. The little nooks/crannies make excellent buttered toast!
I hope you will try your own hand at making this simple and delicious bread! I encourage you to explore further, either via web search or here at the original Artisan Bread in Five web site.


